How to Remotely VNC to Raspberry Pi over internet
Virtual Network Computing, or VNC, is a connection system that allows you to use your keyboard and mouse to interact with a graphical desktop environment on a remote server. It makes managing files, software, and settings on a remote server easier for users who are not yet comfortable with the command line.
In this guide, you'll set up a VNC server on a Raspberry Pi and connect to it remotely through RemoteIoT service. You'll use TightVNC, a fast and lightweight remote control package. This choice will ensure that the VNC connection will be smooth and stable even on slower internet connections.
Step 1 - Installing the Desktop Environment and VNC Server
By default, a Raspberry Pi OS does not come with a VNC server installed, so we'll begin by installing those. Specifically, we will install packages for the latest Xfce desktop environment and the TightVNC package available in the official Ubuntu repository.
First on your device, update your list of packages:
sudo apt updateNow install the Xfce desktop environment on your server:
sudo apt install xfce4 xfce4-goodiesOnce that installation completes, install the TightVNC server:
sudo apt install tightvncserverTo complete the VNC server's initial configuration after installation, use the vncserver command to set up a secure password and create the initial configuration files:
vncserverYou'll be prompted to enter and verify a password to access your machine remotely:
You will require a password to access your desktops.

Password:
Verify:
Once you verify the password, you'll have the option to create a view-only password. Users who log in with the view-only password will not be able to control the VNC instance with their mouse or keyboard. This is a helpful option if you want to demonstrate something to other people using your VNC server, but this isn't required.
When VNC is first set up, it launches a default server instance on port 5901. This port is called a display port and it is referred to by VNC as :1. VNC can launch multiple instances on other display ports, like :2, :3, and so on.
You may check if the VNC server has started successfully and is listening on port 5901 with the following command.
sudo netstat -tulpn | grep tightvnc
Since the release of Raspberry Pi OS Bookworm, the official Pi operating system has moved from X11 to Wayland. The TightVNC don't support Wayland mode. You can use the raspi-config tool to switch between Wayland and X11. Please refer the document "Switching Between Wayland and X11 on a Raspberry Pi".
Step 2 - Installing TightVNC Viewer on Windows
- Download and run the latest version of the TighTVNC installer from the link https://www.tightvnc.com/download.php. If you are uncertain, you probably want the 64-bit version.

- Click Next.

- Accept the agreement and click Next.

- Click Custom.

- Click TightVNC Server and select Entire feature will be unavailable.

- Click Next.

- Click Next.

- Click Install.

- Click Finish.

Once configured, you can use TightVNC Viewer to connect to your local Raspberry Pi ip and port 5901. If you cannot connect to the local Raspberry Pi, you can view the VNC log file in ~/.cache/lxsession/LXDE-pi/run.log.
Step 3 - Connecting the VNC Desktop remotely over internet
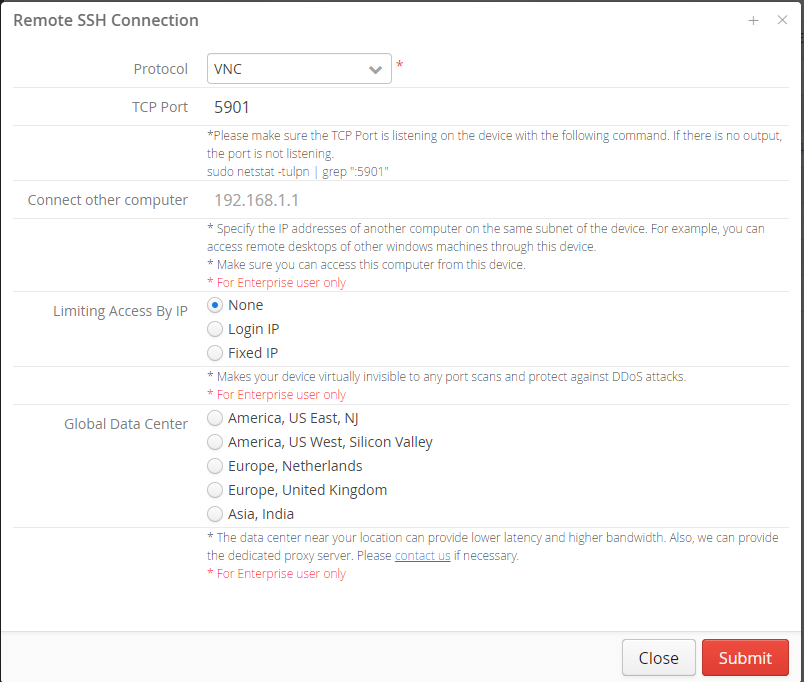
Now create a secure tunnel to connect remotely to the Raspberry Pi over internet. Open the RemoteIoT web portal and click 'Connect Port' on the context menu of the device and select the 'VNC' protocol.

You will get a hostname (like proxy8.remoteiot.com) and a port (like 30001). Now you can connect to the Raspberry Pi with VNC over internet with the link proxy8.remoteiot.com:30001.
The bandwidth required for VNC is far greater than SSH. Our global infrastructure provides a network with low latency and high availability. You can specify a proxy server near your location in a wide data center geographic area. We can provide the dedicated server and higher bandwidth. Please contact us if necessary.
Step 4 - Running VNC as a System Service
Next, we'll set up the VNC server as a systemd service so we can start, stop, and restart it as needed, like any other service. This will also ensure that VNC starts up when your server reboots.
First, create a new unit file called /etc/systemd/system/vncserver@.service using your favorite text editor:
sudo nano /etc/systemd/system/vncserver@.serviceThe @ symbol at the end of the name will let us pass in an argument we can use in the service configuration. We'll use this to specify the VNC display port we want to use when we manage the service.
[Unit]
Description=Start TightVNC server at startup
After=syslog.target network.target

[Service]
Type=forking
User=pi
Group=pi
WorkingDirectory=/home/pi

PIDFile=/home/pi/.vnc/%H:%i.pid
ExecStartPre=-/usr/bin/vncserver -kill :%i > /dev/null 2>&1
ExecStart=/usr/bin/vncserver -depth 24 -geometry 1280x800 :%i
ExecStop=/usr/bin/vncserver -kill :%i

[Install]
WantedBy=multi-user.target
The ExecStartPre command stops VNC if it's already running. The ExecStart command starts VNC and sets the color depth to 24-bit color with a resolution of 1280x800. You can modify these startup options as well to meet your needs.
Next, make the system aware of the new unit file.
sudo systemctl daemon-reloadStop the current instance of the VNC server if it's still running.
vncserver -kill :1Then enable the unit file and start it as you would start any other systemd service.
sudo systemctl enable vncserver@1.service
sudo systemctl start vncserver@1
You can verify that it started with this command:
sudo systemctl status vncserver@1Conclusion
You now have a secured VNC server up and running on your Raspberry Pi. Now you'll be able to manage your files, software, and settings with an easy-to-use and familiar graphical interface, and you'll be able to run graphical software like web browsers remotely.
