How to connect a remote raspberry pi?
Typically, if you want to connect to a raspberry pi on a local network, you first need to find its IP address and then connect its port. However, in order to access a raspberry pi from outside the local network, you usually need to jump a lot of laps, such as getting its public IP address and adjusting some settings on the NAT router. Changing the VPN/firewall configuration can be cumbersome if the raspberry pi is behind a corporate firewall which does not allow ssh or VNC connections.
RemoteIoT provide a way to skip all the hassles. You can use the RemoteIoT secure IoT cloud platform to quickly connect to networked raspberry pi from anywhere, even if it's behind a firewall. Just follow these 3 simple steps.
Step1: Create a RemoteIoT account
Before connecting your raspberry pi, open up RemoteIoT website in your browser and signup a new account which should just take a minute and is completely free.
Setp2: Install the RemoteIoT service
Open the terminal of your raspberry pi or access your raspberry pi with ssh on the local network and install the RemoteIoT service.
Setp3: Connect your raspberry pi
Now, open the RemoteIoT portal in your browser and login to the dashboard. You should now see your raspberry pi in the list of account devices.
Click "Connect Port" and select the SSH or VNC port. You will get a hostname (like proxy8.remoteiot.com) and a port (like 10008). Now copy the hostname and port to the ssh or vnc client and connect to the raspberry pi as if it was on the local network.
You can also use web console to connect devices directly in your browser. Web console is a standard terminal emulator for the X Window System. The service allows devices to be connected directly from the browser, avoids opening ports visible to outside and leaves a zero-attack surface.
Architecture
Secure Remote connection
RemoteIoT uses a secure AWS IoT cloud platform to connect to networked devices from anywhere. RemoteIoT provides a secure mechanism for encrypting and encapsulating private network traffic and moving it through an intermediate network. Data is encrypted for confidentiality and wrapped with an IP header containing routing information.
Users can work at home, on the road, or at a branch office to connect in a secure fashion to a RemoteIoT device via the Internet. From the user perspective, the RemoteIoT is a point-to-point connection between the user's computer and an IoT Device. The nature of the intermediate network, the Internet, is irrelevant to the user because it appears as if the data is being sent over a dedicated private link.

Secure Tunneling
Tunneling is a network technology that enables the encapsulation of one type of protocol packet within the datagram of a different protocol. For example, Windows VPN connections can use Point-to-Point Tunneling Protocol (PPTP) packets to encapsulate and send private network traffic, such as TCP/IP traffic over a public network such as the Internet.
The RemoteIoT tunnel is the same as PPTP VPN. Both endpoints of the tunnel must agree to the tunnel and must negotiate configuration variables such as address assignment, encryption or compression parameters. In most cases, data transferred across the tunnel is sent using a datagram-based protocol. The RemoteIoT tunnel management protocol is used as the mechanism to create, maintain, and terminate the tunnel.
After the tunnel is established, data can be sent. The tunnel client or server uses a tunnel data transfer protocol to prepare the data for transfer. For example, when the tunnel client sends a payload to the tunnel server, the tunnel client first appends a tunnel data transfer protocol header to the payload. The client then sends the resulting encapsulated payload across the network, which routes it to the tunnel server. The tunnel server accepts the packets, removes the tunnel data transfer protocol header, and forwards the payload to the target network. Information sent between the tunnel server and the tunnel client behaves similarly.
Advanced Features
The Enterprise Edition provide these advanced features.
Remote Web Console
Remote Web Console is a standard terminal emulator for the X Window System that allows devices to be connected directly from the browser, avoids opening ports visible to outside and leaves a zero-attack surface.
Permanent Tunnel
For other versions, the port is dynamic, and a tunnel can be kept for 2-8 hours. After 8 hours, the tunnel will be disconnected, and the port number will be removed. For the Enterprise Edition you can always connect devices to the same host and port.
Multiport at the same time
For other versions, only one port is supported at a time. For example, when you connect to the ssh 22 port, you will not be able to connect to the vnc 5900 port. For the Enterprise Edition, you can connect to multiple ports of this device at the same time.
CloudWatch Alarm
CloudWatch alarms can monitor these state changes of your devices such as connection status, CPU utilization, memory utilization and CPU temperature. For example, when a device is offline, an alert email will be sent to your email account.
Limiting Access by IP Address
Restrict device access to specific IP addresses or login IP using a web browser. Make your device virtually invisible to any port scans and protect against DDoS attacks.
Monitor SD card health
Provide insights about the manufacturing date of the SD card, total data writes and error counts, and provides the remaining life to determine when the SD card needs to be replaced
Global Proxy Server
Our global infrastructure provides a network with low latency and high availability. You can specify proxy servers near your location in a wide geographical area of data centers. Also, we can provide the dedicated server and higher bandwidth. Please contact us if necessary.
Prevent port scan attacks
Attackers often use port scanning to map out their attacks. They send client requests to a range of server port addresses on a host, with the goal of finding an active port and exploiting a known vulnerability of that service.
We have many protections against this kind of attack.
First, our service can be configured as a firewall to allow fixed IP ranges to access these devices. It makes your device virtually unaffected by any port scan and protects against DDoS attacks.
Second, access to a device is only allowed some IP after logging into the web portal within 24 hours. This method is more flexible than a fixed IP address.
Finally, you can also use the web console to connect devices directly from your PC browser or mobile device. The web console is a standard terminal emulator for the X Window System. The service has been encrypted using SSL session cache and leave a zero-attack surface.
Install service
Java JVM
Java and the JVM (Java's virtual machine) are required for the RemoteIoT service. If your system doesn't have JVM or you find any ssl exception, please install the recommended OpenJDK 8 which is open-source and the default Java version of the ubuntu and centos Linux system.
In ubuntu please use the command as below:
sudo apt-get -y remove java*
sudo apt-get -y install openjdk-8-jre-headless
In centos please use the command as below:
sudo yum -y remove java*
sudo yum -y install java-1.8.0-openjdk*
Setup
Type the following command to register RemoteIoT service in your device.
curl -s -L 'https://remoteiot.com/install/install.sh' | sudo bash -s 'your_setup_key' 'Device name' 'Note' 'Group'
Access with domain name
You may wish to have easy access your device with yourself domain name. The Enterprise version support the Permanent Tunnel. You may redirect your (sub)domain to a certain Permanent Tunnel URL.
Select "URL" record type in your DNS management page, put @ (your bare domain e.g., yourdomain.tld) for Host and use http://ipaddress:port for Value (IP address and port should be replaced with the Permanent Tunnel URL):
Firewall setting
Since our service does not require any inbound ports and outbound ports are generally not restricted by these routes or firewalls, you generally do not need to set any special rules in these routes or firewalls.
But if your routes or firewalls restrict outbound message, these 22, 443, 8088, 8883 and 8884 TCP outbound ports to our server 172.104.6.188 need be allowed.
You can test if the network can reach our server with the following command:
echo > /dev/tcp/remoteiot.com/443 && echo 'Port is open' || echo 'Port is blocked' If you use the VPC network, please allow the UDP protocol for outbound messages.
To reduce latency and improve availability, our Enterprise plans support additional global proxy servers located in data centers across a wide geographic area. If you use these global proxy servers, you may also need to allow these ports to connect to them. If you do not use them, you can ignore and block these messages sent to them.
Batch deployment
1. Please run the following script to install the latest version of RemoteIoT service on one device without registering the initial image to the backend. This original image is only used for cloning to other devices.
curl -s -L 'https://remoteiot.com/install/install.sh' | sudo bash -s 'your_setup_key' 'install_only'* Please replace "your_setup_key" with your account's setup key.
2. Add the auto-deploy file with the following command and then shut down the device and copy the device image.
sudo bash -c 'echo -e "device_name=your_device_name \nnote=your_note \ngroup=your_group" > /etc/remote-iot/auto-deploy'* To use the serial number of Raspberry Pi as device name or note, please enter the symbol "RaspberryPi_Serial".
* To use the network mac address as device name or note, please enter the symbol "Network_Mac_Address".
* To use the hostname as device name or note, please enter the symbol "hostname".
3. Boot a new device with the duplicated image, RemoteIoT will automatically register that device as a new device.
Reduce mobile data usage
To reduce mobile data usage on mobile devices, you may adjust the keep alive interval parameter which determines how often the device sends data packets to the server to maintain connectivity.
sudo bash -c 'echo -e "AliveInterval=120" >> /etc/remoteiot.conf'
sudo /etc/init.d/remote-iot restart
Installing in OverlayFS
In IoT devices, an OverlayFS file system typically overlays a read/write data partition over a read-only system partition, which not only protects the system from tampering but also protects the flash memory with a limited number of writes.
You can follow these following 3 steps to quickly install the RemoteIoT service in the OverlayFS file system.
1. Disable OverlayFS and install the RemoteIoT service with the following command.
curl -s -L 'https://remoteiot.com/install/install.sh' | sudo bash -s 'your_setup_key' 'Device name' 'Note' 'Group'2. If your data partition is mounted in the /data folder, run the following command to move the RemoteIoT folder to the data partition and create a soft link.
mv /etc/remote-iot /data
ln -s /data/remote-iot /etc/remote-iot
3. Enable OverlayFS and reboot the system. All RemoteIoT services will run normally on the OverlayFS file system.
Upgrade
Type the following command to add upgrade script into the crontab job.
echo "0 2 * * * curl -s -L https://remoteiot.com/install/upgrade.sh | sudo -s bash" | crontab
Uninstall
Type the following command to remove the RemoteIoT service from your device.
curl -s -L 'https://remoteiot.com/install/uninstall.sh' | sudo bash -s 'your_setup_key'Manage devices
With the RemoteIoT service, you may manage thousands of devices at the same time including monitoring CPU, Memory and Network usage, performing any actions and running batch jobs on devices.
Monitor device
When click the device, the monitoring CPU, Memory and Network usage show in the below panel.

Connect device
Click the context menu of the device, select the 'Connect' command in the context menu and input the TCP port which you want to connect.

You can then use the returned host name and port number to connect your device. Please copy and paste the host name and port number into your client tools.

Execute Script
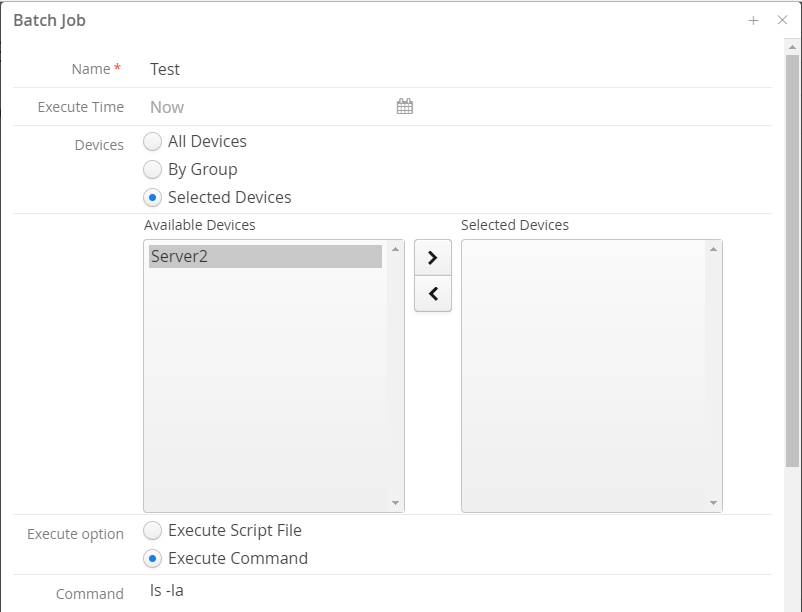
You may run these batch jobs on thousands of devices at the same time. Please click the 'New Job' button in the 'Batch Jobs' page.

Select these devices and specify the 'Execute Time' and the command or script file.

Upload files
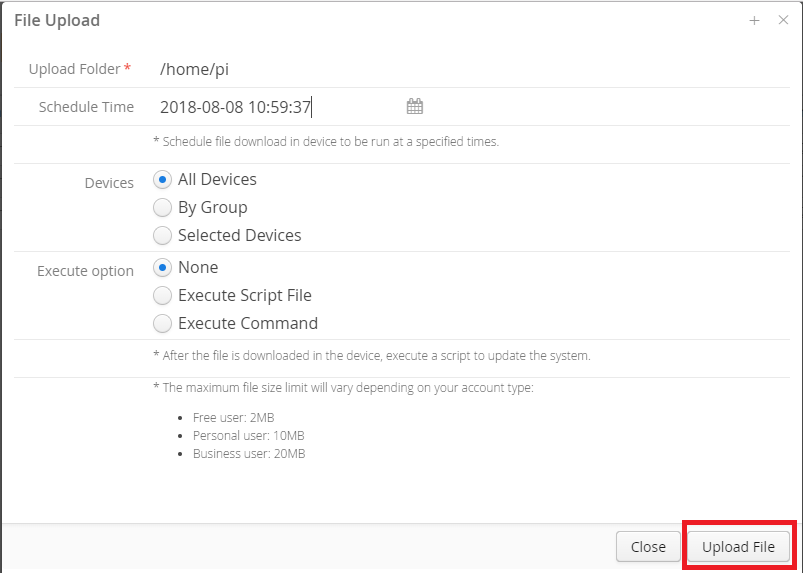
You may upload a file into thousands of devices at the same time. Please click the 'Upload' button in the 'File Upload' page.

Specify the upload target folder and the 'Execute Time' and click the 'Upload File' button.

Group and User
Users and groups are used on RemoteIoT for access control. Device and users may be grouped together into a "Group". Users can only access these devices under their group.
Create group
Click the "Add" button in the Groups page.

Add user
Add a user and assign the user to a Group. Click the "Add" button in the "Users" page. If users don't assign to a group, they can access all devices.

Assign a device to a Group
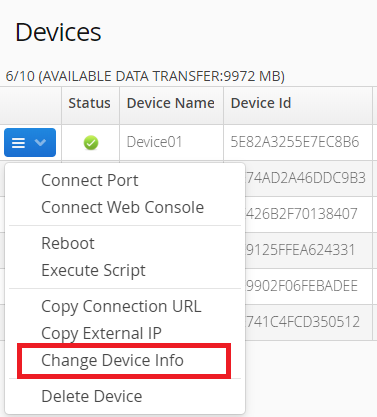
The administrator can assign a device to a Group. Click the context menu of the device and select the "Change Device Info" command in the context menu.

